

Introduction
Resource Nodes act as the interaction layer for mining and gathering resources, with various options for how and when resources are collected.
Setting up
There are some sample prefabs in Demo/Resources or you can create your own starting from /Prefabs/ResourceNode_Master.
If you wanted to set up from scratch, a couple of things to remember –
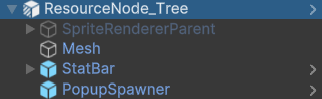
The parent should contain the Resource Node component, with the Mesh with Collider (3d or 2d) attached as a child. Any other components you wish to add to the Resource Node such as a StatBar for the Hp, an Info Icon to display the first Resource type, or a Popup Spawner should also be children of the Resource Node gameobject.
It should look something like this if you wanted every add on.
Everything else is free to explore, and is best to try out which settings work for your game – see below for what each setting does.
Settings
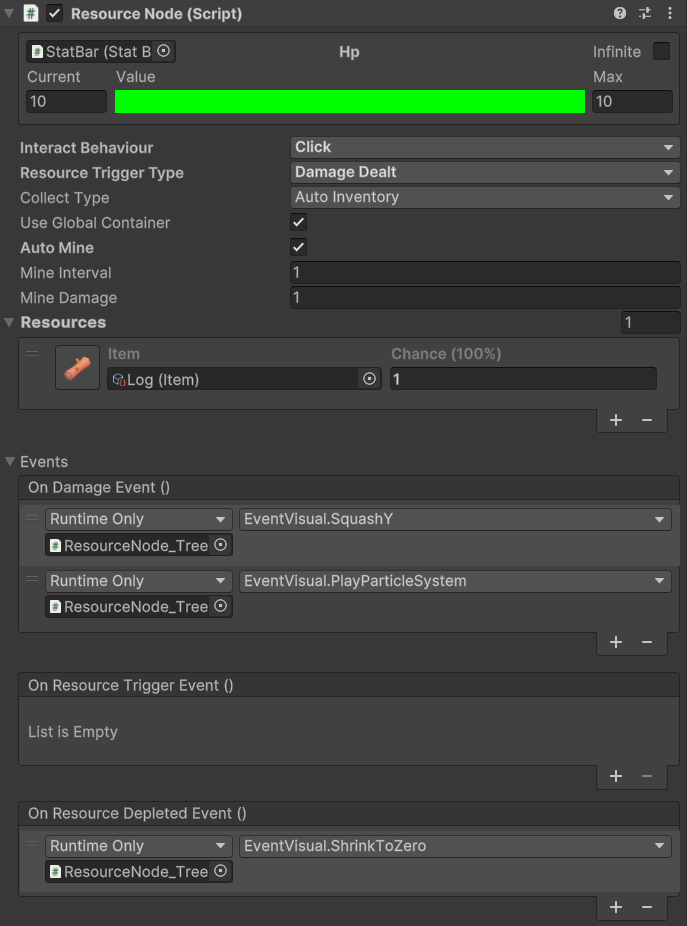
Hp Stat
Controls how much damage the Resource Node can take. See the Stat class for more info on this class.
Interact Behaviour
Click – A simple click will interact with the Resource Node, applying the Miner damage in a single hit.
Click and Hold – Click and Hold to apply damage over time on the Resource Node. It will apply the same amount of damage every second as a single click would.
Disabled – No interaction will occur with this Resource Node.
Resource Trigger Type
How and when resources should be triggered and given to the player.
See Resource for more details on this class.
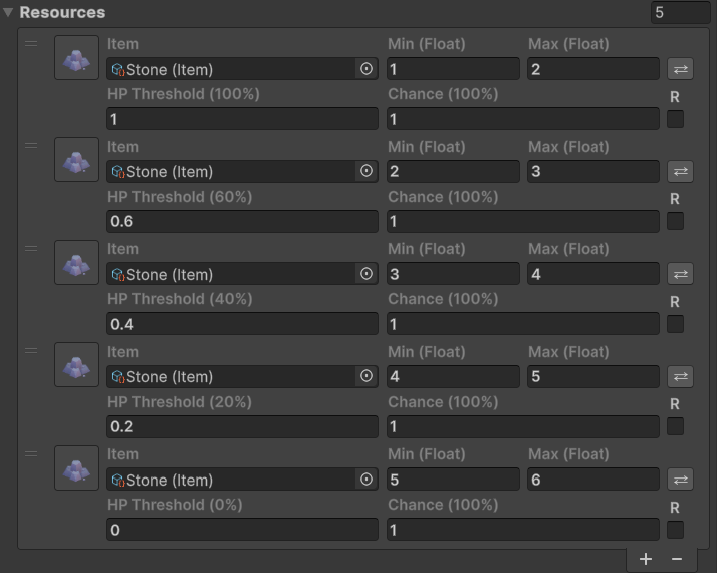
Hp Threshold – Give resources based on the remaining Hp remaining. You can manually set an Amount, or a range (click the dot) and set the chance this occur. This method should be chosen when more specific requirements for giving resources need to be met.


Auto Distribute Thresholds
Only available on Hp Threshold Trigger Type – Will equally distribute the HpThreshold evenly. So if you have 10 resources, it will evenly distrbute to give resources at 100%, 90%, 80% and so one.
Damage Dealt – Simply gives the Item assigned with the Chance, with the Amount matching the damage dealt by the Miner class.

Collect Type
Auto Inventory – Adds the resource straight to the inventory system.
World Collect – Spawns a WorldItem gameobject that can then be collected later by the player. This is setup on the Item Scriptable Object
Use Global Container
If true stores any Resources gained through the global Inventory storage system.
If false, an Item Container is required to be assigned to store any Resources gained.
Auto Mine

Automatically mines the Resource Node without interaction. This can also be set to start and stop via code.
Mine Interval
How often the automatic mining should occur.
Mine Damage
How much damage should be applied, this is seperate from the Miner class.
Resources
Resources are assigned into the list with varying parameters. See Resource class for more info on exactly what each of the fields means.
The example above will generate the following –
First hit at 100% hp will generate between 1(float) and 2(float) Amount of Stone with a 100% chance.
Once hp is below 60% it will generate between 2(float) and 3(float) Amount of Stone with a 100% chance.
Once hp is below 40% it will generate between 3(float) and 4(float) Amount of Stone with a 100% chance.
Once hp is below 20% it will generate between 4(float) and 5(float) Amount of Stone with a 100% chance.
Once hp is depleted it will generate between 5(float) and 6(float) Amount of Stone with a 100% chance.
All of these are not set to recur.
Events
As with most of the core systems, there are key events you can hook into either via the editor, or via code.
On Damage Event
Only available on Click interact behaviour. Triggers whenever the Resource Node is clicked.
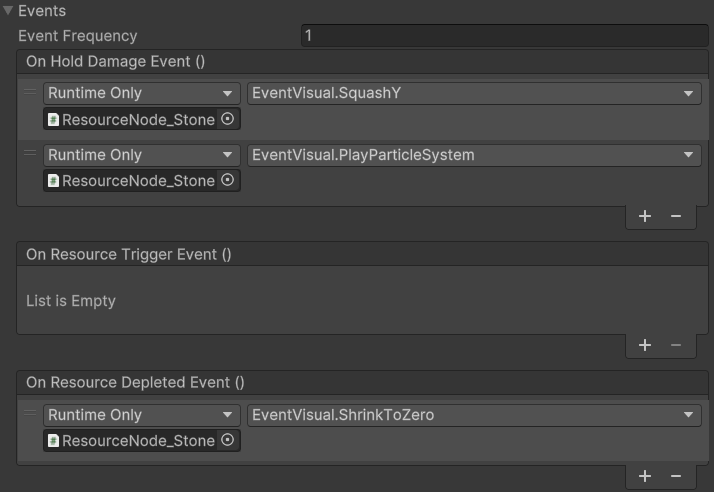
On Hold Damage Event
Only available on Hold And Click interact behaviour. Triggers every Event Frequency. Event Frequency – How often the On Hold Damage Event should fire as damage is continuous, its usually undesirable for the event to fire every frame.
On Resource Trigger Event
Triggers when Resources are actually collected. Popup Spawner uses the Action<ItemAmount> version of this UnityEvent to trigger its popups.
On Resource Depleted Event
Triggers when the Resource Node runs out of Hp.
Events have counterpart Action versions that sometimes contain additional information than the UnityEvent versions. See scripting below to learn how to hook into these.
Saving and Loading
All Resource Nodes that need saving must have the Saveable Object component added to it, which in turn will add a Unique ID component.
Check SaveManager to see how to do custom save and load back into your scene.
Three parts are saved for Resource Nodes, the Current Hp, Auto Mine bool (As this can be set via code) and the Collected bool of each of the Resources. (This one is hidden in Property Drawer but can be seen in Debug mode). Any Resource Nodes placed during runtime ARE saved however because this asset does not do any building logic, you would need to first of all build this asset back into the world – then get its save data (see below scripting for more details on how to do this) and then finally reinstate the Resource Node as saved.
Loading is fairly straght forward and will load exactly as saved. Destroyed Resource Nodes before saving will be completly reinstated if they were placed in the editor. As the asset has nothing to do with building – all destroyed Resource Nodes should be dealt with in how you define your placement/removal/loading logic. If placed in the editor, your loading logic could remove the gameobject if it was destroyed.
Extras
There are some nice complementary components for Resource Node, such as the Event Visual, Popup Spawner, Stat Bar and Info Icon.
Any extras can be drag and dropped as child to this component’s gameobject. For super UI control, add a UI Billboard to Stat Bar and Info Icon, or use the prefab for both StatBarInfoIcon in /prefabs/UI.
Event Visual
Animates the component using public functions.
Popup Spawner
Displays a popup of the Resource that is gained from mining.
Stat Bar
Assigned to Resource Node Hp Stat in the left hand corner to display the Hp of the ResourceNode.
Info Icon
Displays the first Resource Item Icon in the Resources list
Scripting
This section will cover scripting for developers wanting to hook into the system. Most public methods have a summary and info on what each parameter is for.
//Actions
//Triggers on click damage
public Action<float> OnDamageAction;

//Triggers on click and hold damage
public Action<float> OnHoldDamageAction;

//Triggers on Resource collected
public Action<ItemAmount> OnResourceTriggerAction;

//Triggers when the Resource Node has no more Hp
public Action OnResourceDepletedAction;

//Examples of how to set up the Actions
private void Start()
{
    resourceNode.OnDamageAction += (damage) => DoSomething(damage);
    resourceNode.OnHoldDamageAction += (damage) => DoSomething(damage);
    resourceNode.OnResourceTriggerAction += (itemAmount) => DoSomething(itemAmount);
    resourceNode.OnResourceDepletedAction += DoSomething;
}

/// <summary>
/// Applies damage, and checks conditions for resources to be given
/// </summary>
public void OnClick()

/// <summary>
/// Applies damage per frame, and checks conditions for resources to be given every second
/// </summary>
public void OnHold()

/// <summary>
/// The main function to damage the ResourceNode
/// </summary>
/// <param name="damage">The damage to apply</param>
public void Damage(float damage)
//This method will simply modify the Hp of the Resource Node and nothing more

/// <summary>
/// Get a given resource depending on its chance and parameters set for the Resource
/// </summary>
/// <param name="resource">The Resource to give</param>
public void GetResource(Resource resource)

/// <summary>
/// Checks to see if the node has no Hp and not set to Infinite
/// </summary>
/// <returns>true if current Hp less than or equal to 0 and not set to Infinite</returns>
public bool IsDepleted()

/// <summary>
/// Returns if the node still has Hp or is set to Infinite
/// </summary>
/// <returns></returns>
public bool HasHp()

/// <summary>
/// Starts auto mining
/// </summary>
public void StartAutoMine()

/// <summary>
/// Stops auto mining
/// </summary>
public void StopAutoMine()

//Saving and Loading
public object CaptureState()
public void RestoreState(object state)